0%

tornado(二)——源码分析(一)

这里将从服务开启到请求进入之后的顺序进行源码解析。分析有误的地方希望大家指出哦~

开发环境:

  • python3.7、tornado5.0

我们先创建一个最简单的tornado应用,从简单的栗子开始进行源码分析:

1
2
3
4
5
6
7
8
9
10
11
12
13
14
15
16
17
18
19
20
21
22
23
24
25
26
import tornado.httpserver
import tornado.ioloop
import tornado.options
import tornado.web

from tornado.options import define, options

define("port", default=8000, help="run on the given port", type=int)


class IndexHandler(tornado.web.RequestHandler):
def get(self):
greeting = self.get_argument('greeting', 'Hello')
self.write(greeting + ', friendly user!')


if __name__ == "__main__":
tornado.options.parse_command_line()
app = tornado.web.Application(
handlers=[
(r"/", IndexHandler)
]
)
http_server = tornado.httpserver.HTTPServer(app)
http_server.listen(options.port)
tornado.ioloop.IOLoop.instance().start()

程序运行

首先,进入main中:

1
tornado.options.parse_command_line()

这一句通常是配合define("port", default=8000, help="run on the given port", type=int)一起用的。他会解析命令行参数

实例化tornado.web.Application

接下来,实例化tornado.web.Application对象,最简单的方式,就是这样的:

1
2
3
4
5
app = tornado.web.Application(
handlers=[
(r"/", IndexHandler)
]
)

在初始化的过程中,发生了什么呢?
在源码中,我们发现,官方对他的解释是A collection of request handlers that make up a web application,也就是说,其实他就是一个handler的集合,并且他可以自己本身成为一个web应用。我们发现他继承ReversibleRouter类,它本身是一个抽象类,在ReversibleRouter类中,只有一个方法,这个方法可以理解为路由的反向解析。继续深挖,ReversibleRouter类又继承了Router类,Router类又继承了httputil.HTTPServerConnectionDelegate,因此,这样我们可以梳理出来一个tornado.web.Application的继承顺序。
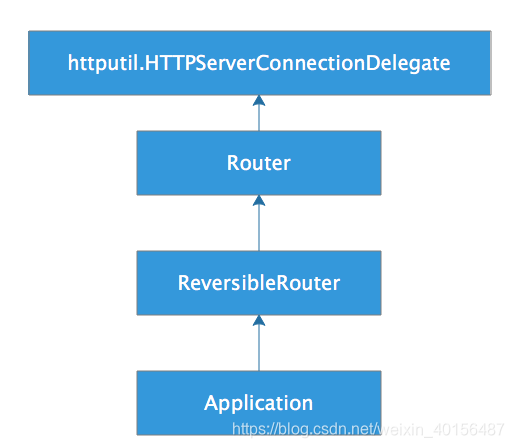
在这里插入图片描述

我们继续说初始化发生的事情。在Application__init__()方法中有四个参数:

1
2
def __init__(self, handlers=None, default_host=None, transforms=None,
**settings):
  • handlers:是一个url路由列表,每一个路由都由一个元组组成;
  • default_host:当tornado接受到request但是没有指定handler或者没有能够匹配的handler的时候,使用default_host做自动跳转
  • transforms:HTTP传输压缩等,默认GZipContentEncoding 和 ChunkedTransferEncoding
  • settings:对于一些静态文件、debug配置、ui的设置

当实例化Application的时候,主要做了以下操作:

加载ui模版

1
2
3
4
5
6
7
8
9
10
11
  def __init__(self, handlers=None, default_host=None, transforms=None,
**settings):
··········
self.ui_modules = {'linkify': _linkify,
'xsrf_form_html': _xsrf_form_html,
'Template': TemplateModule,
}
self.ui_methods = {}
self._load_ui_modules(settings.get("ui_modules", {}))
self._load_ui_methods(settings.get("ui_methods", {}))
··········

获取静态文件路径配置,并将favicon.ico和robots.txt添加到handlers中。这也是为什么当我们第一次请求的时候会发现找不到favicon.ico,tornado会自己到/static/favicon.ico找。

1
2
3
4
5
6
7
8
9
10
11
12
13
14
15
16
17
 def __init__(self, handlers=None, default_host=None, transforms=None,
**settings):
········
if self.settings.get("static_path"):
path = self.settings["static_path"]
handlers = list(handlers or [])
static_url_prefix = settings.get("static_url_prefix",
"/static/")
static_handler_class = settings.get("static_handler_class",
StaticFileHandler)
static_handler_args = settings.get("static_handler_args", {})
static_handler_args['path'] = path
for pattern in [re.escape(static_url_prefix) + r"(.*)",
r"/(favicon\.ico)", r"/(robots\.txt)"]:
handlers.insert(0, (pattern, static_handler_class,
static_handler_args))
·······

获取debug参数,如果为True他会在代码修改后,自动重启。但是生产环境下不要打开debug。

1
2
3
4
5
6
7
8
9
10
11
12
13
  def __init__(self, handlers=None, default_host=None, transforms=None,
**settings):
·············
if self.settings.get('debug'):
self.settings.setdefault('autoreload', True)
self.settings.setdefault('compiled_template_cache', False)
self.settings.setdefault('static_hash_cache', False)
self.settings.setdefault('serve_traceback', True)
··············
# Automatically reload modified modules
if self.settings.get('autoreload'):
from tornado import autoreload
autoreload.start()

将Application与handlers进行绑定,内部会将handlers的对应关系告诉Application

1
2
3
4
5
6
7
8
  def __init__(self, handlers=None, default_host=None, transforms=None,
**settings):
···········
self.wildcard_router = _ApplicationRouter(self, handlers)
self.default_router = _ApplicationRouter(self, [
Rule(AnyMatches(), self.wildcard_router)
])
···········

到此为止,Application已经初始化结束。关于tornado.web.RequestHandler具体的实现后续会讲,小小的期待哦~

实例化tornado.httpserver.HTTPServer

实例化HTTPServer时,会将Application传入,就像这样:

1
http_server = tornado.httpserver.HTTPServer(app)

tornado.httpserver.HTTPServer是一个单线程非阻塞的HTTP服务,它多继承自TCPServer,Configurable, httputil.HTTPServerConnectionDelegate。通常情况下,在实例化一个类的时候,会依次调用__new__()__init__(),但是在tornado.httpserver.HTTPServer的__init__()注释中,它是这样解释的:Ignore args to __init__; real initialization belongs in initialize since we're Configurable. (there's something weird in initialization order between this class, Configurable, and TCPServer so we can't leave __init__ out completely),也就是说,HTTPServer初始化会通过Configurable类找到HTTPServer的initialize()(HTTPServer,Configurable和TCPServer之间的初始化顺序有些奇怪,所以我们不能完全抛弃__init__())。

通过debug的方式,我们发现,他会首先进入Configurable__new__()中,其实当前真正的类对象是HTTPServer,因为HTTPServer继承自Configurable。简单一点来讲,在这里主要做的就是调用HTTPServerinitialize(),并且HTTPServer是单例的:

1
2
3
4
5
6
7
8
9
10
11
12
13
14
15
16
17
18
19
20
21
22
23
24
class Configurable(object):

__impl_class = None # type: type
__impl_kwargs = None # type: Dict[str, Any]

def __new__(cls, *args, **kwargs):
base = cls.configurable_base()
init_kwargs = {}
if cls is base:
impl = cls.configured_class()
if base.__impl_kwargs:
init_kwargs.update(base.__impl_kwargs)
else:
impl = cls
init_kwargs.update(kwargs)
if impl.configurable_base() is not base:
# The impl class is itself configurable, so recurse.
return impl(*args, **init_kwargs)
instance = super(Configurable, cls).__new__(impl)
# initialize vs __init__ chosen for compatibility with AsyncHTTPClient
# singleton magic. If we get rid of that we can switch to __init__
# here too.
instance.initialize(*args, **init_kwargs)
return instance

进入到HTTPServer.initialize()之后,我们发现request_callback是一个必传的参数,这个参数对应的就是我们传入的Application对象了。

http_server.listen(options.port)

实例化tornado.httpserver.HTTPServer对象后,我们需要调用listen(),开始监听端口并接受给定端口上的连接。

1
2
3
4
5
6
7
8
9
10
def listen(self, port, address=""):
"""Starts accepting connections on the given port.

This method may be called more than once to listen on multiple ports.
`listen` takes effect immediately; it is not necessary to call
`TCPServer.start` afterwards. It is, however, necessary to start
the `.IOLoop`.
"""
sockets = bind_sockets(port, address=address)
self.add_sockets(sockets)

在这个方法里,做了两件事:

  1. 通过调用bind_sockets(port, address=address),在给定端口创建监听socket
  2. 告诉socket开始接收请求,并将每一个socket都加入到IOLoop中,通过,为这个socket绑定事件